
Inserts
When ordering an insert, you have to know what size best fits your tub. The size is determined by the thickness of the apron, or the [front] wall that you step over getting in & out of the tub. While all our inserts are all just over 28” long, they come in three sizes: small, medium & large.
Insert Placement Considerations
Rather than centering your insert on the apron, you may decide to place it more towards either the faucet or rear end of the tub. When placing your opening more towards the front end, plan it no closer than 8” to the faucet wall. This should allow enough access for your caulk gun and avoid having to deal with the apron’s curve towards the faucet wall when fitting the insert. For rear placements, back off at least 1 ½” from the intersection where the sloping rear wall meets the inside wall at 10” down. This will avoid having to deal with shaping a compound curve when fitting the insert.
Tub Styles
For simplicity’s sake, consider the birds-eye illustration of a straight-wall tub at the right. Straight-wall tubs are characterized by the fact that for most of the apron’s length, the inside and outside walls run:
- parallel to one another, until the inside wall reaches the end and,
- straight i.e., if you placed a yardstick on edge horizontally onto either wall, all points along the tub wall would remain in contact with it.
We consider the bump-out tub straight-wall as “the bump” outside plane is parallel with the aprons inside wall. Sizing for both these tub styles can be made at their apron center-points.

Inside Curved Wall Tubs
While the sizing of straight & bump-out wall tubs is taken at the center of the apron, curved and expanding inside wall tubs present more of a challenge. Here placement of the insert is critical, as the size requirement can change very quickly as the 28” long insert is placed deeper into the widening wall.
Start by selecting a starting point on the apron and mark. Measure over 28” from this point and mark. This represents the area where the insert will be located. Starting at the end with the narrowest wall, place your gauge over the apron and try sliding it towards the opposite end. Does the gauge move freely inside this area? If not, either move the starting point further into the narrower section or try the next larger gauge. In either case, keep in mind the Insert Placement Considerations discussed earlier.

Bowed Rail Tubs
Unfortunately, none of the forgoing sizing procedures apply to bathtubs with bowed rails. Most bowed tubs that we’ve encountered have been fiberglass and required a large insert for an 8” reduction. To visualize the sizing needed, imagine an insert 28” long (rectangle) over a curved apron as indicated the red rectangle in the illustration to the right. Moreover, you need to gauge the size 10” down at the center-point of this rectangle.
But how do you get the measurement 10” down? Well, you could start by taping a 28” yardstick section down 10” on the inside wall of the tub. At the arc’s center point using a medium paint stirrer gauge to see if the distance from the apron’s outside wall to the inside of the “yardstick” (blue arrow) fits. Bowed tubs are better left to the professionals.

Sizing
To determine the proper insert size for either of these styles, you need a gauge. We will cover two versions of gauges and how to make them. However, except for steel apron “muffin tops”, a simple paint stirrer gauge is accurate for sizing the aprons of most tubs. The object in sizing is to find the smallest size insert that will fit the apron. By doing so, you minimize the amount of insert extending out from the tub, thereby reducing the possibility of creating a tripping hazard. If the inside wall curves, see Inside Curved Wall Tubs before sizing your insert.
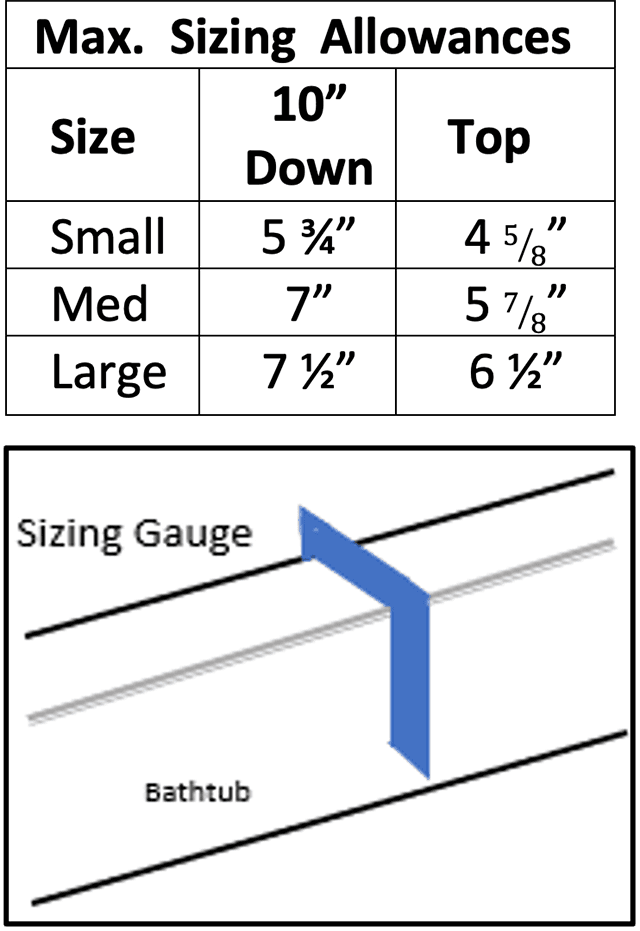
Sizing Gauge
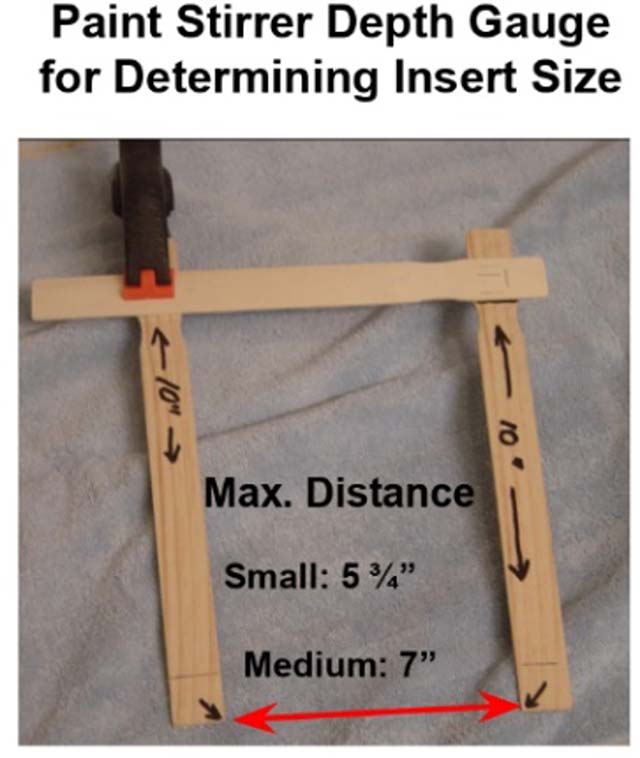 In sizing, the driving measurement is always taken 10” down from the top of the apron. Our most popular insert sizes are small and medium inserts and have a maximum apron wall limit of 5 ¾” and 7” respectively, at 10” down.
To make a small gauge, use 3 paint stirrers (or rulers) and 2 binder clips or spring clamps.
depth gauge legs - measure 10” up from the bottom edge of two paint stirrers and mark.
top brace (3rd stirrer) - attach one leg at its 10” mark to the top brace at 90º and either staple or clip the pieces together.
 from the edge of the attached leg, measure over on the top brace and make marks at 5 ¾” & 7” and identify as such.
attach the 2nd leg’s 10” mark onto the top brace at the 5 ¾” mark.
verify the inside distance between the legs at the bottom is at 5¾” (red arrow) and that the legs extend 10” down from the brace.
place the gauge over the apron's center (or starting point) to see if it:
- clears along a 28" stretch on the apron; if so, go to step 7.
- binds, move the leg to the next larger size & repeat steps 4-6 for that size.
check to see if the top width of the apron is 4 5/8” or less; if not, repeat steps 4-6 for the next larger size.
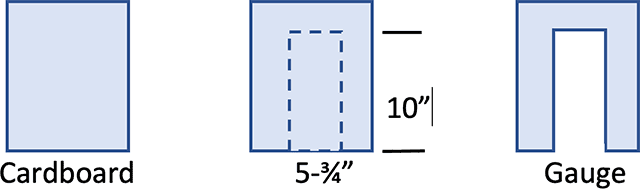
No Paint Stirrers? – No Problem
Substitute cardboard, chip board (e.g., cereal, shoe box) or poster board.
Courtesy of www.OhioWalkinShowers.com
Call Jim: 440-667-8827