
They say that a picture is worth a thousand words. Below are some videos and pics to help you visualize our tub cutting process.
Plain Dealer: "Chuck Yarborough finds converting a tub to a shower is grinding work: On the Job Training"
We invite you to read this article by Chuck Yarborough of The Plain Dealer.

Our Process
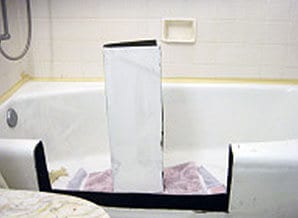
1. Tub section cut out and removed
Figure 1 - The tub cut
Our tub to walk-in shower conversion begins with cutting and removing a section from the side of the homeowner's existing bathtub.

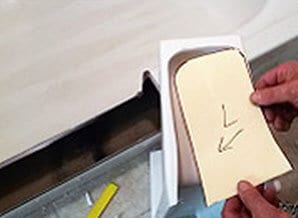
2. Copying the tub's profile
Figure 2 - Copying the tub's profile for customization
With the tub section removed, we then trace home-owner’s tub apron’s profile onto a sheet of cardboard. This traced outline will be cut out to serve as a template for transferring the tub’s profile onto a blank step-in insert.
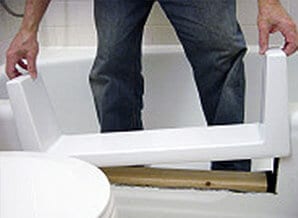
3. Customizing the insert to the opening
Figure 3 - Customizing the insert cut to the tub
The template then is traced onto a blank insert, thus customizing the step to the profile of the homeowner’s existing tub. (Photo shown after insert has been cut).
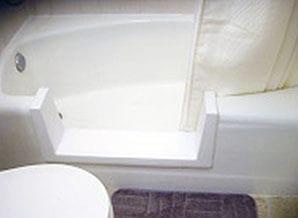
4. Step insert is fitted into opening
Figure 4 - Step insert is fitted into opening
The cut step insert is fitted onto the homeowner’s tub. (Note that the insert slips over the opening, rather than into the opening. This feature encapsulates any chipped edges incurred during the cut to keep them from rusting.)
An infrastructure can be seen inside the cut out. This structure provides support should the homeowner step on it.
5. Step insert is sealed over the opening
Figure 5 - Step insert is sealed over the opening
The insert is finally sealed and fitted to the opening. It will be ready for showering the next day!For a no-hassle estimate, please call Jim at 440-667-8827.